Active
File Recovery

Creating Disk Image

How to erase hard drive? Windows7 logo   How to erase hard drive? Intel logo

User's guide:

Create a Disk Image

A Disk Image is a mirror copy of your entire logical drive (volume) or physical device (HDD, USB, ...) stored as set of files. It may be agood idea to create a Disk Image for a drive containing deleted files that you want to recover,if you have enough space on another drive.

You might ask, "Why should I create a Disk Image on a drive that holds my deleted files?"

Here is the answer: If you do something wrong while attempting to recover the files (for example, recovering files onto the same drive could destroy their contents), you will be able to recover these deleted files and folders from the Disk Image that you have wisely created.

Disk Image (Active@ Image format) consists of configuration file (with an extension .DIM) and set of file chunks having extensions .000, .001, .002 ... By default Active@ File Recovery tries to create one file (chunk) for the whole volume/device. However, if the target location is FAT, it may not be possible due to file system limitations. In this particular case the disk image is split into several chunks and each file has a size of 2Gb. Chunks content can be RAW or RAW-Compressed, depending on settings.

To create a Disk Image:

  1. Start Active@ File Recovery and select a drive (volume) or physical device that you want to create image for
  2. To open the Create Image dialog box, do one of the following:
    • Choose Create Image... from the File menu
    • Press Ctrl+I key combination
    • Right-click the device and choose Create Image on the context menu
  3. Select another physical device or another logical drive to store Disk Image files
  4. Browse to the folder where you want to save the Disk Image
  5. To give the Disk Image file a different name, type a new name in the File Name field
  6. Click Save to start Disk Image creation
  7. Watch the progress and wait while drive's contents are copied to the new location. You may cancel the process of image creation anytime by clicking Stop

To create Disk Image default options being used.
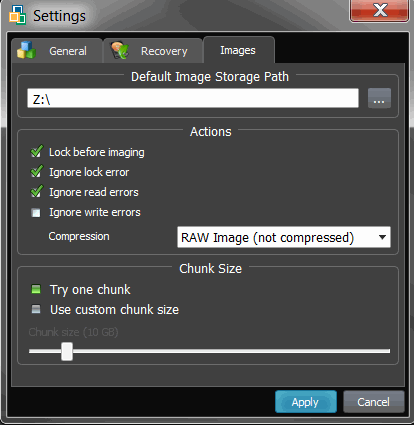
To change Disk Imaging default options:

  1. Click Settings toolbar button, or choose Settings... from View menu, or press F2
  2. Click Images tab
  3. Change default storage path, locking and error options, compression and chunks splitting options: file recovery

Important

You must always create a Disk Image on a drive other than the source drive. Do not try to save a Disk Image of a drive onto itself.

See Also

Open and work with Disk Image

This document is available in PDF format,
which requires Adobe® Acrobat® Reader
(Free download):

USER'S GUIDE (PDF)

Data Recovery

Data Utility

Data Security

Data Backup

CD/DVD Tools