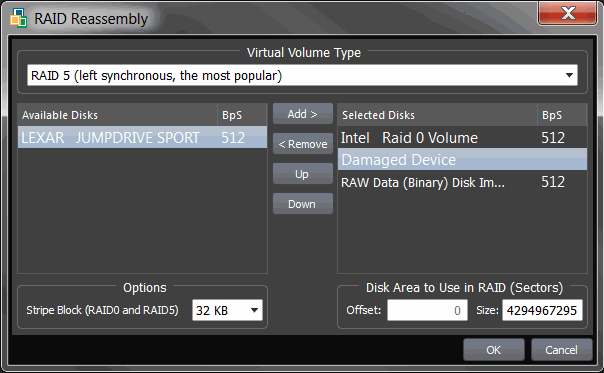
Virtually Reassemble Deleted or Damaged RAID
There are many reasons for a Redundant Array of Independent Disks (RAID) system to fail (RAID controller failures, software RAID emulator errors, etc.). Active@ File Recovery provides an easy
way to assemble array disks together and make damaged or deleted data accessible.
You can combine together a disk that was previously used as a part of a RAID
system in a temporal (virtual) disk array. With this virtual configuration, you are
able to perform all drive file recovery manipulations as though it is regular drive.
You can even to create a Disk Image for the whole RAID and store it to a safe location.
It is important that you specify the parameters of the RAID system
that you know existed before the fault so that you can virtually reassemble the
same system.
It is also important to list the disks in the correct order when
making a virtual disk array. In most cases, the correct order is unknown.
The only way to discover the correct order is to try all available combinations until you reach the one that works. If you are dealing with only two disks, it is simple. You have only two ways to arrange the order. If there are three disks, you must try a maximum of six combinations. If there are four disks, 24 combinations, and so on...
Each time you try a combination, write down the order you are trying, click OK and check the results by trying to access and scan the newly-created virtual RAID that is added to the list of Local System Devices. If you don't see your data or if there was an error during virtual array creation, mark this one as a failure and try another order of disks in array.
To create a Virtual Disk Array (RAID):
- To open RAID Reassembly dialog, do one of the following:
- Click Virtual Disk Array (RAID) toolbar button:

- In the Tools menu, choose Virtual Disk Array (RAID)...

- To choose a supported RAID type, in the Virtual Volume Type
area, choose one of the following:
- Stripe Array (RAID-0)
- Data located in stripes (blocks of size 32KB, 64KB, 128KB,
etc.) distributed between two or more drives
- Mirror Array (RAID-1)
- Data on two disks is identical - provides complete data duplication (or
mirroring)
- RAID-5 Array
- Data located in stripes distributed between two or more drives with parity
control
- Span Array - Data located
contiguously on one disk then on another
disk, and so on...
-
To select disks from a list to create a virtual disk array:
- In the Available Disks list, select a device (or disk image)
- To add it to the Selected Disks list, click Add
- Repeat steps a. and b. for every disk in the original array.
If one of the disks is physically damaged and not accessible, and if you have selected RAID-5 in step 2,from the Available Disks list add Damaged Device instead of the named damaged disk
- To change the order of disks in the Selected Disks list,select a disk name and click Up or Down to change its position in the list
- To indicate the size of the stripe block, in the Options
area, type the size of the block in kilobytes in the Stripe Block
(RAID0 and RAID5) field. This is applicable only to RAID-0 and RAID-5 arrays. Standard
values are 32Kb, 64Kb, 128Kb, 256Kb. If you are not sure, try each
size until you get the correct one
- To indicate the offset and the size of the device, measured in sectors (each sector is 512 bytes), in the Disk Area to Use in RAID (Sectors) area, type the
values in the Offset and Size fields. In most cases, the default values are acceptable. Some RAID controllers use only part of the disk surface. For example HighPoint 370 uses the first
100 sectors on the first drive for its own system information. In this case you would specify the offset as 100 sectors
- Click OK to start Virtual Disk Array reassembly process
- In the Local System Devices list, a new Virtual Disk Array
device node appears. You may
treat this new node and its contents the same way that you treat
other device nodes in the list.
You may follow the standard steps to scan
the Virtual Disk Array node, then search for files and folders to be recovered. You may also create a Disk Image of the whole Virtual Disk Array to work with it later on.
Note
When dealing with Span Arrays, you may get the size of a Damaged
Disk a couple of ways:
- Go to the hard drive manufacturer's web site and look for the model.
- Look for the device geometry label on the top of the physical
drive. If you find it (it is not always there) you can multiply the parameters C*H*S (Cylinders
* Heads *Sectors per Track) to get the number of sectors. For example, Samsung SW0212A
has the following: CYL 4092, HD 16, SEC 63, 2.1GB.
Multiply 4,092*16*63 to get 4,124,736 sectors. To calculate the disk size, multiply 4,124,736*512 = 2,111,864,832bytes =2.1GB. We
just confirmed the size 2.1GB. The size is marked on drive label and that proves that our calculations are correct.
Important!
When dealing with RAID5 Arrays, if the most frequently used Left Async type does not work for you,
you may try some several different types of building array:
- Left Asynchronous (the most frequently used in hardware RAIDs)
- Left Synchronous (used in the most software RAIDs, based on LDM)
- Right Synchronous
- Right Asynchronous
You may consult your RAID controller manufacturer to determine the proper RAID5 type being used in hardware.
See Also
Performing Extended Device Scan
Searching for Deleted Files and Folders

